![]()
![]()

Retro Rockets is an
authorized PerTronix dealer.
|
|
|
Retro Rockets Project El Camino
Summary The car: 1983 El Camino, mild 350 Targetmaster crate engine, Turbo 350 transmission, 2.41 posi rear (ya, 2.41). Gas mileage as received from seller: 14.1 mpg. Changes made to date (June 2009): Remove ECU and computer-controlled carburetor and distributor; replace with '71 mechanical Q-jet and PerTronix HEI distributor; tune engine. Best gas mileage to date: 20.1 mpg.
The Full Story We here at Retro Rockets were
looking for a project car. Our idea
was to get the most out of it using PerTronix products.
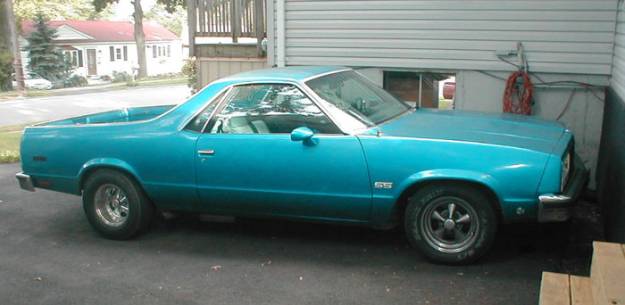
We found the above‘83 El Camino (picture provided by seller, ignore the
bogus “SS” tags) in need of some TLC that could serve as a parts hauler and
general run around vehicle. The
original 305 had been replaced with a Chevy Targetmaster 350, a very mild 8.5
C.R. crate engine, with about 20K miles on it.
The intake is an aluminum Chevy piece from the early ‘80s with
an electronic Quadrajet. The
distributor is an electronic GM HEI, the tranny is a Turbo 350 and the rear is a
2.41 posi. Okay, it’s not going to set any records at the track but,
as it is, it should get some decent gas mileage with that rear.
Those are 14 x 8 Cragars on the back sporting ancient Gillette H60 14s
with lots of tread but badly dry rotted, cracked sidewalls.
The tires were of such questionable integrity that they had to have inner
tubes in order to hold air. The fronts are 15 x 7s with some decent Kumhos. We
decided to run the car as received (except for those rear tires) to see what
kind of mileage we got. The seller
threw in another pair of Cragar 15 x 7s with some obscure brand of tires, but at
least they looked like they’d last a few miles.
They went on the rear. The
engine ran sort of okay, but not great. The
first tank of gas yielded a disappointing 14.1 mpg.
Time for some tuning. With
the computer controlled carb and distributor there wasn’t a lot to play with
easily. The caps were off the idle mixture screws so they were the
first to be tweaked. A vacuum gauge
showed only about 13-14 in. Hg at idle, way too low for a mild engine like this.
Sure enough, as the screws were turned in to lean out the mixture, RPM
and vacuum increased. Idle was leaned out till the max vacuum was achieved, 19 in.
Hg. Over the next couple of
fill-ups the car averaged 18.2 mpg. The
only problem was we had a serious bog in the engine at light throttle between 30
and 45 mph. The previous owner had
cranked open the idle mixture screws to mask the bog, but that killed the gas
mileage. The
computer was controlling the carburetor and distributor.
We’re not sure if everything was optimized for this engine.
It seems the fuel curve in the ECU that was programmed for a 305 was too
lean at light throttle for the 350. What
we plan to do is bypass the computer and try to get better results with some old
school parts. We have a crusty
Q-jet on the shelf from a ’71 350 which we’ll clean up and rebuild.
When that’s ready we’ll replace the electronic distributor with a
PerTronix Street/Strip HEI, p/n D1000. The
PerTronix distributor comes with three sets of centrifugal advance springs and
an adjustable vacuum advance. That
will allow us to dial in the advance curves.
A new set of PerTronix 8 mm MagX2 spark plug wires will also be
installed. Later
we plan to improve the exhaust system.
The engine currently has headers of unknown provenance. Some of the tubes have been dutifully bashed to provide
necessary clearances - an esthetic offense at the very least, not to mention the
negative effect on exhaust flow. GM
G-body transmission cross members do not have provisions for a dual exhaust so
the current exhaust pipe on the driver’s side after the header collector is
flattened to about half its diameter to clear the cross member.
The rest of the exhaust system can only be described as “interesting”
with a collection of hose clamps and wire holding things in place.
The tail pipes exit in front of the rear wheels filling the inside with
exhaust if you open a door with the engine running. The
headers will be replaced with a set of Patriot (a division of PerTronix) full
length headers, p/n H8047-1. These
have 1 5/8” primary tubes and 3” collectors.
We’ll either modify or find a replacement transmission cross member to
accommodate a dual exhaust without having to flatten the driver’s side pipe.
Tail pipes will run out the back. We have a wish list for this car for the future. Tops on the list are steeper rear end gears and an overdrive transmission, preferably a 200R4. That would make it a lot more fun to drive. We have a line on a drivetrain from a Monte SS with a 3.73 posi rear. That rear has a rather small 7.625” ring gear, but if we don’t go crazy at the track and just run street tires, we probably won’t blow it up (how’s that for famous last words?). An 8.5” G-body posi rear would be ideal, but they’re hard to find and expensive. The
final things on the wish list are engine mods.
We don’t want to go crazy with this since we’d still like to get
decent mileage. However, a couple
of things would really help wake up this engine, like a set of Chevy Vortec
heads and a slightly healthier cam. The
Vortec heads will flow a lot better and the smaller combustion chambers would
bump up the compression ratio. We’ve
had really good results in a 350 using a mild Crane cam with 210/216 degrees at
.050 lift and 114 degree lobe separation. If
we’re careful, these mods might even get us a bit more mileage. We’ll keep you posted on the progress of Project El Camino. We welcome your comments.
Carl Dudash November 2008
Chapter II (April 2009) Winter
finally ended so it was time to work on cars again.
First on the list for the El Camino was to rid it of the
computer-controlled carburetor and distributor. The ’71 Q-jet we had on the shelf was cleaned up and
rebuilt. It wasn’t quite the easy
swap with the electronic Q-jet that was hoped for. The later electronic model had an electric choke while the
’71 had linkage for the old bi-metal in the intake manifold cavity set up.
Since the intake on the engine had no such cavity, we just locked the
choke in the open position. With the warmer weather we now have the car starts okay.
No telling how or if it will start when it gets cold out.
I’m hoping for the best, but I can just see myself trying to rig
something up when it’s freezing out. The
other problem was that the electronic Q-jet had a few more vacuum ports than the
’71. It has taken a bit of
creative branching of vacuum ports to feed some of those other minor incidental features like power brakes. The ’71 Q-jet also didn’t have the same fittings for the throttle
cable and tranny kick-down cable as the later carb, so we had to fabricate them.
The fittings are available from Edelbrock and Holley if you want to pay
their prices. We
ran the car for a while with only the ’71 carburetor retrofitted. The computer-controlled distributor was still in place.
There's no telling what advance curve the computer was giving the
distributor, but the car ran surprisingly well.
The light throttle bog that was so prevalent with the electronic carb was
completely gone.
This week we replaced the electronic distributor with a PerTronix HEI,
part number D1000. Once the slot in
the top of the oil pump shaft was in the right position, the distributor dropped
right into place. The D1000 comes
with three sets of centrifugal advance springs and an adjustable vacuum advance.
The spring sets give the following advance curves:
The
question now was what should the advance curve be for this mild 350 engine?
The only possibly applicable information we had was from a ’69 Chevy
Service Manual. In it we found the
centrifugal and vacuum advance specs for a mild 350 engine distributor.
In performance applications you would usually want all the centrifugal
advance in by 3000RPM. While this
engine is not exactly a screamer, we decided to start with the lightest advance
springs to get the centrifugal advance in quickly.
Then we calculated what the total timing curve would be in my cruising
RPM range (1400 RPM @ 45 mph, 2025 RPM @ 65 mph) using the ’69 Chevy specs and
tried to duplicate that with the D1000. Here’s
the resulting set-up: Lightest copper centrifugal advance springs 10o initial @ idle (no vacuum or centrifugal advance) 12o max vacuum advance We’ll get some gas mileage figures on this setup and publish them in the next couple of weeks. Hint: If you decide to use very light advance springs to get your centrifugal advance in quickly, chances are you will be getting some centrifugal advance in even at idle. This makes it difficult to establish the desired initial timing. Use heavier centrifugal advance springs to set the initial timing that won’t give you any advance at idle, then switch to the light springs.
Chapter III (June 2009) The mileage with the centrifugal and vacuum advance curves mentioned above was 18.0-18.5 mpg. The initial centrifugal advance curve gave us a bit of pinging when climbing a steep hill when the engine was warm. The throttle was open enough to eliminate vacuum advance so it seemed like there was a bit too much centrifugal advance. We replaced one of the copper advance springs with the slightly heavier silver spring to slow down the centrifugal advance some. To keep the light throttle advance high we tried increasing the vacuum advance. We set it to 20o max. This yielded the best gas mileage yet of just over 20 mpg on a recent tank full. The driving miles were about half in the 35-45 mph range and half in the 45-60 mph range in fairly hilly country. We're still getting a hint of pinging on steep hill climbs so a little more tuning is needed. But, it sure felt good to record a solid 20 mpg so we know we're on the right track. | ||||||||||||||||||||||||||||||||||||||||||||||||
Contact Information
|